This week I wanted to share various ways of making placemats which of course work perfectly with last week's coasters. This is something else I've made a lot of so I will add some free tutorials as well as some of my patterns.
Placemat can vary in size but a good size is 12" x 16". It is easy to make any adjustments you need to suit your style and needs.
1: Strip Pieced Placemats: These strip pieced placemats are a great way to use up leftover strips. It is best to coordinate fabrics but you can really make anything work. Here is a link to the Free pattern: Strip Pieced Placemats

Strips in various sizes
2: Matching Pear Placemats: Remember the pear coasters I mentioned last week? Here are some matching placemats.
Work the pear shape and panel on the left as you do for the coasters but extending the background piece to the height of your placemat (plus seam allowances). For example, if you want a 12" high placemat, make the background 12" plus seam allowance. You can leave the width as is, say 4" finished so take that off your total placemat width. If the total width is 16" it would be 12" (16-4=12) so the right-side panel would be 12" x 12" plus seam allowances. Using the template provided last week, add some more applique pears on the right side to balance it. Finish off by quilting (if you look closely, you can see I added the pear shape again for quilting) and binding your placemats.
 Pear placemats
3: Crazy Quilting Placemat: You can use scraps and decorative stitching to piece together placemats using this technique. You can make one large piece and cut all the placemats out of it if you like. You can also cut them any shape too just like the one below and add applique if you wish. This is a great way to play around with those fancy stitches on your sewing machine that you might have never used before as well as using leftover fabric scraps. If you want to know how to finish off these irregular edges, check out my "20 Methods to Finish Your Quilts" e-book.
 Crazy Quilt hexagon placemat
4: Strip Piecing Chevron Style: Using 2-1/2" strips you can easily make wonderful placemats like these. I've made mine in two different colors - gold and red. Start with a 2-1/2" square and add strips on two sides of that square. Keep adding strips until you get to the size you want. Add a rectangle to one side to add extra length. The full instructions for these placemats can be found here: Free Placemat Tutorial
 Christmas Placemats
5: Reversible Placemats: These are fun to make and you can make them for two festive times so double their use! I have Christmas on one side and Thanksgiving/Fall on the other. This is one of my patterns.
 Fall and Christmas
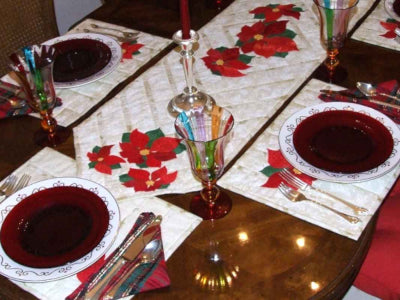
6: My favorite Christmas Placemats and Tablerunner: These are my very favorite and as you can see look elegant as a Christmas setting. You can find the pattern for this here: Poinsettia Collection
7: One of my first patterns: Autumn Daisy is also a set and great for the Fall. This set even looks great on a sideboard! For more details about this pattern visit my website: Autumn Daisy
You can find more table setting patterns on our website here: Table Linen


