
This week I wanted to share one of my favorite gifts to make, coasters. I've done quite a few over the years as they are ideal gifts. Many I have given away, others I have kept for myself.
You can take basically any odd block or sample and cut it up for coasters. Add a little thermal batting or a couple of layers of cotton batting to ensure the heat from a hot coffee doesn't transfer to a polished table. You can cut your coasters square or round and any simple shape you like. I've included three shapes in this PDF for you to use. Coaster Shapes and here are some idea for you to try...

Pear coasters:
I've pieced together small scraps of fabric and odd strips, trying to stick to one color scheme, autumn tones in this case. This will make up the shape.... a pear shape or some other simple design. Make the pieced fabric larger than you need so you can play around a bit (excess pieces can always be joined or added to). Here are some fun shapes you can use including the pear: Coaster Window Shapes
The background is cut a little larger than your finished coaster size so you can trim it back (approx 5" x 5") and the wrong side is fused. Then you cut out the shape from the center of the background fabric - don't cut through from the edge, just remove the central piece to make a window.... this leaves you with a single shape to use elsewhere, perhaps matching coasters in reverse!
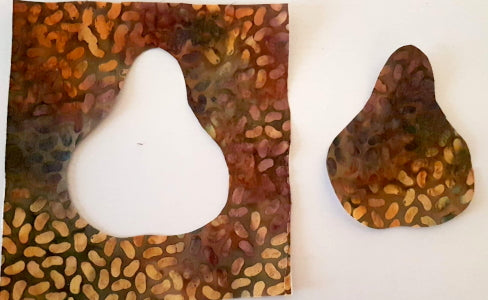
Layer the pieced section on top of batting, then place the background (window) over top, positioning it to get the best effect. Press in place, then stitch around the shape to hold the background fabric down. I like to stitch around twice.
Now trim down the edges to the finished size you want the coaster. Add any other applique such as leaf and stem (included in pdf as well) if you wish and finish off each coaster using a standard binding.

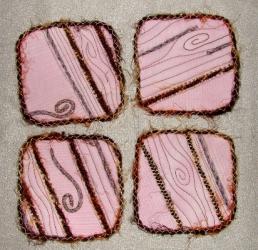
Layered Scrap Fabric Coasters:
Another way of creating fabric from scraps is by layering them. I used small scraps less than 2" that I'd cut from making half-square triangles for this particular one, but any scraps will work in the desired color you want. These are not fused but rather laid on top of a background fabric with a sheer fabric over the top to hold them in place. Then some fancy stitching practice can be done with decorative thread to hold everything together.
I have a tutorial for this coaster which includes the binding for round coasters. You can find here: Scrap Fabric Coaster tutorial

You can use the same idea to make any shape such as stars or bells. I used cookie cutters to trace and cut out shapes from the quilted fabric, then I edged them with red braid.
To stitch the braid in place I used a narrow zigzag.

Cherry pie coasters:

These are cute to make and can be made with many different fruit or vegetable fabrics for the filling - or basically any fabric if you wish. They are easiest made as one set using a 10-14" square.
The pie is made with strips of fabric or bias binding. These are woven over the top of your fruit fabric square leaving approximately 1/2-3/4" between each strip so the pie filling shows through.

Use a round template (which is best cut from freezer paper as it can be pressed down to hold the strips from moving) as a guide to stitch around being super careful that the strips don't move. Once they are stitched down, you can cut out the coaster shape and bind them.
See the tutorial in the previous coaster idea for the round binding.
Decorative Fabric Coasters:

Creating decorative fabric is so much fun! Stitching and couching threads in place and playing around with new designs or even practicing quilting designs.
I have a tutorial for creating decorative fabric which even has a video showing me couching and free-motion stitching. You can find it here: Decorative Fabric Tutorial
To finish these off I couched a thick thread around the edge using the same method as shown in the video. Note: it is easier to couch around curves than is it a right angled corner.
Here are some more I have made.

Art Quilt or Scrap Block Coasters: These coasters were cut from a small art quilt piece made in one of my blog challenges. You can make them from any left over blocks or small quilts you no longer want or even samples or test pieces. No limitations of ideas, that's for sure.
Read my tutorial on how I used a cardboard frame to select just the perfect placement when cutting out these coasters. Cutting Coasters from template tutorial
To finish these off, I've simply selected an overlocking stitch on my machine and stitched around them. The overlocking stitch goes over the raw edges to keep them all in tack. A wide zigzag can work too.
You can do the same thing with blocks like these nine-patches.

Or how cute would coasters made from this practice sample of sashiko look?

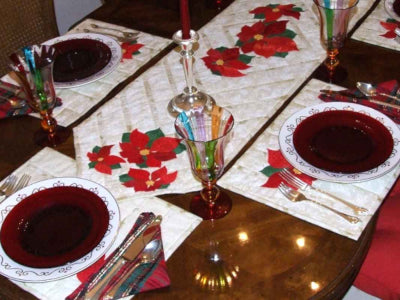
Of course, even nicer is when you use scraps from your table runner. Imagine how this setting would be with matching coasters?
[edit May 2023] I added a new tutorial for coasters using Solvy which is a water soluble stabilizer. You can find the tutorial here: Another Way to Make Coasters
Happy coaster making!


