As I was making my Christmas quilt "Christmas Cracker", I was thinking what I could do with all the scraps after trimming all the snowball corners - I was left with a pile of triangles after all and it seemed a waste just to throw them out.

red and white triangles leftover from snowball corners
I could join them together to make half square triangles - I would if they were a little bigger - but it doesn't seem worth it with these so I decided to get a little creative instead and use some of them up.
First I got a suitable background fabric placed a piece of thin batting under it and then I lay the triangles out all over the background fabric - oh yeah don't forget a backing too.

triangles on background
Since my background was a gold fabric and I was already using red and white I thought this could be a great Christmas project. But it needs a little green. So I cut some green slithers of fabric and lay them on top of the triangles.
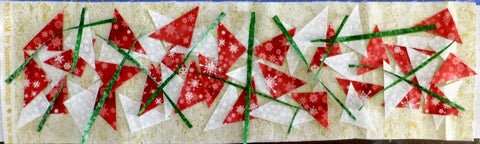
green strips added
Next I covered the entire section with a sheer fabric. I used a sheer so you could still see the red green and white fabric under it.

sheer fabric covering
Here's a closeup.

closeup of sheer on top
Next I pinned the layers together as I would a quilt and then I stipple quilted all the layers together using a metallic thread - this is a good way to practice some different quilting techniques or threads. I decided to make some Christmas coasters so looked for a round lid to use as a template.

a lid makes a great template
I drew a circle and cut it out. You could baste around the circle first if you like but my stipple was fine enough to hold everything in place.

ready to cut out
Once cut out I cut a 2\" wide strip of fabric on the bias to bind it. I folded it in half lengthwise and then stitched it to the wrong side easing the binding around without stretching it.

stitching bias to back side
Then I trimmed off the end and tucked it into the start. I turned the binding to the front and top stitched it in place.

top-stitching
How cool is that?

finished Christmas coaster
Time to make more - I have enough to make four. You could make table mats this way or even use these as Christmas ornament by doing the same for the back side as well. Give it a go. I'd love to see some!


