
Did you know that our popular Trinity Celtic Knot quilt pattern (pattern can be found by clicking link) designed by Deborah Cohen is now available as an online class? Today I want to take you inside the class for a preview of what you can expect, but first I must say thank you Deborah for this wonderful Celtic patchwork design and allowing me to present it online as a quilting class.
The class of Trinity Celtic Knot is called Knot of Squares which describes it wonderfully for it is a celtic knot made from squares.

The quilt pattern designed to be a scrappy quilt, explains how to make this design using strips that are joined and recut into the required pattern. For the class, I have included this method along with the original piecing method of all squares as well as a third method of block construction for a three fabric only design. It is also written in multiple sizes. You can make any to suit, or two if you like.
There are more options too, two extra border options and various quilting designs, all of which are explained in detail. We'll get back to those in to moment.
I include many photos in this class as you can see below. In fact, more than you would get in a book. The image only shows a few of them.

The class starts out by showing suitable fabrics - good choices and bad choices. I include images showing both. I also provide bulk cutting tips and useful tools to speed up the process.

Bulk cutting unit strips
Once the cutting is complete we move onto the construction. As mentioned above, there are three methods included in this class. I give you pressing instructions, showing how to best press the seams and make perfectly matching seams....

Butting seams
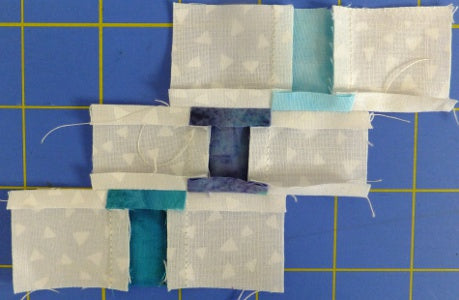
Pressing open
....plus tips on keeping points as points and not cut off or floating.

Sewing details and tips
Because we are working with many different unit constructions, I have an easy way to keep them sorted so that when you get to stage two of the construction, it goes together quickly.

Units sorted ready for stage 3 construction
Do you ever see this on the back of your quilt? I include a quick fix - how and where to correct this without unpicking.

Fixes for twisted seams
The one problem I see happening with this design is getting all those units correct and around the right way. I made the following error while constructing mine but I picked it up before the block was completed. Can you see the error?

What's wrong? Which is right?
I added a seminole border to mine - this would be for the more advanced quilter. Beginners can use plain or pieced borders. All three have instructions in my class.

Border options
In the last lesson, I give various quilting methods. These included straight quilting....

Contour Quilting
...and free-motion options.

free-motion quilting
The workshop includes video clips of all the free-motion techniques.
And that's not all..... There is help to make your quilt bigger or rectangular like one of my students did here:


6 comments
Glad to hear that Maria!
I loved it
Hi Marika, thank you for reaching out. If you can please email me, I can give you the details for teaching with this pattern. I look forward to hearing from you!
This is a beautiful pattern and I really would like to teach it in my group. What will the cost be. We are from South Africa
Hi Peggy, can you please email me at arbee @ arbeedesigns.com? It sounds like the pattern didn’t download fully.