
Anita has a great idea for recycling totes. With plastic bags out, we are required to bring our own bags for shopping. Often we gather branded totes and we can decorate these to give as gifts or use ourselves. Of course, you can also start from scratch by making your own tote too.

Anita's totes
We can decorate any of these totes with fun blocks such as Still Life Pears (ideal for a grocery bag), an animal block (ideal for children), patchwork blocks, or flower blocks.

Still Life Pears for Grocery bags

Animals for Children's bags
Today Anita is sharing how she decorated the Thriftway bag shown above.
Recycled Tote Tutorial
The first thing I did was to measure my tote to find out what options I have. The side that will be covered is 12.5" x 12.5". The lettering covers an area of 6" x 9" so I will need a block at least this size.
So 9"x9" or 10"x10" or 12"x12" blocks would work well. Of course, if you prefer, you could also use a rectangular block or a pocket can be attached too.
The next step is to look at my already made blocks to find any that may be suitable. These are test blocks for various patterns that I have considered for this bag.

Sample blocks
I like the strong contrasts the Entwined Star block creates on the tote. The heart block would need corners added so it isn't sideways. And, I think the daffodils will become the cover of a throw pillow to go with one of my quilts.... so I have decided on Entwined Star.
Testing the block against the bag, I confirmed that it will be a good choice.
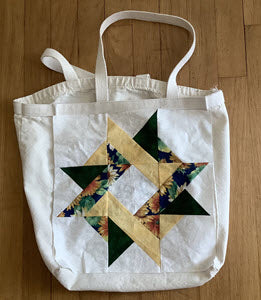
Testing the block against the tote
Next, I will pin baste the layers together - that is, interfacing, batting, and quilt block right side up. The layers will keep the printing from showing through and allow me to add some quilting to the block.

For this, I quilted in the ditch around the star first, and ran a line of stitching about 1/8” from the edge of the block. Once the block is anchored other quilting can be added or not.
Baste the block onto the tote, then either hand stitch or machine stitch the block in place. When using a larger block like I have, stitching it can be a challenge. If you use a smaller block, it will be easier to maneuver the tote under the machine. I suggest starting at the center bottom of the block and stitching around to the top center, stop and start again at the bottom center working around in the other direction to the center top again.

My finished tote
As an extra step: Adding a panel inside the bottom of the bag makes it easier to load. You can use cardboard, plastic, foam board, or mat board. All of which can be covered by a contrasting fabric or fabric used in your block. Making this removable allows you to be able to wash your tote which is really important if you are carrying food items.
Ta Da! The bag is finished.... Anita
For a Christmas tote, I used Anita's idea and my last week's Christmas block to add decoration to a small tote I had. Here's how that worked out...

My Christmas tote
Do you have some pre-made totes? What will you use to decorate it?


