
Pillowcases and towels are on my list for this week. Both are very simple to make and fast too. Let's take a look.
A very simple decorative towel can be made by adding a strip of fabric to a premade towel. Simply sew a strip across one end as Anita did here.
A plain dish towel embellished with a border of Christmas fabric
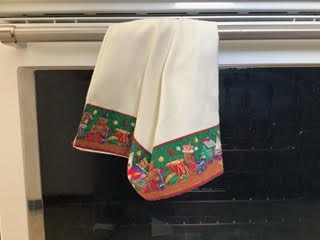
Or applique can be added as I have done for this towel. I like to finish my Christmas towels with a plaid bias binding. One note about adding applique directly on a towel is that you need something to stabilize the stitching, like stitch 'n' tear so the stitching doesn't pucker. You need to be able to remove it later so make sure you put it under the towel, not between the towel and applique layers.

My Christmas Towel applique
(applique pattern is available)
You can add applique or a fabric print to suit any occasion. Thanksgiving, Easter, Christmas, Halloween, Valentines, or even birthdays!
Pillowcases are super quick too. There are two simple ways to make decorative pillowcases - of course, any print can be simply turned into a pillowcase without decorations added.

Anita's pillowcases
The best way to make the right size for you is to measure one of your own pillowcases. If you are measuring a pillow, make sure you allow for the curve!

Measure the curve of the pillow
Note: For my tutorials below, I refer to the measurement shown above as the length of the pillow while the opposite measurement is the width.
Straight Pillowcase Tutorial
- Cut the main section twice as wide as the pillow measurement (A) x the length minus the panel measurement (B) adding seam allowances.
- Cut the panel twice as wide as the pillow measurement (A) x twice the width of the panel measurement (C) adding seam allowances. Note: don't make the panel too small. The larger it is, the easier it is to turn. 4"-6" is good.... and remember to cut it double.

Green dashes indicate size of finished pillowcase
- Place the main section right side up on table. Place the panel on top with right sides facing and raw edges even on one short side.
- Roll up main section and pull free edge of panel around and underneath the main section so it meets the two raw edges. Pin in place with all three raw edges even.

Roll panel so main section is inside
- Sew the seam (3 layers) down the long edges of the panel. Press it, then turn right side out.
- Fold in half with right side together and sew across the top and down the end. Using a serger neatens the raw edges. I prefer to use a french seam so all raw edges are hidden - for this, I sew this step with right sides out to make a narrow seam, trim and turn inside out to make the second seam to encase the raw edges. This ensures there are no raw edges visible at the edge of the opening.

Fold and stitch remaining edges

French seam shows no raw edges
Envelope Pillowcase Tutorial
- Cut the main section twice as long as the pillow measurement minus the panel x the width of the pillow adding seam allowances.
- Cut the panel as wide as you want plus 6" for the envelope flap x the width of the pillow adding seam allowances.
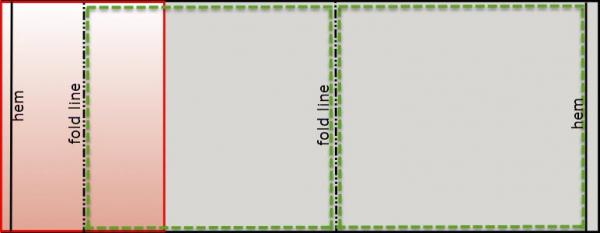
panel shown in red - green dashes are finished size of pillowcase
- Join the two sections together to form one long piece as shown above.
- Hem both short ends.
- With right side up, fold panel section in half (or along fold line above) so right sides are together. Fold main section over so hem is close to first fold. The flap will be inside.

Creating the envelope
- Sew the two seams. Use a serger or zigzag to neaten the raw edges (seams are hidden well within the pillowcase so no need for french seams here). Press and turn right side out.
Both of these methods can be decorated easily. Adding a small edging (strip folded in half and placed in the seam as shown in Anita's pillowcases earlier), bias or piping makes for a simple decoration.
If you like patchwork, you could easily add some flying geese or a Seminole pieced border. I have a free flying geese tutorial or you can learn more about Seminole Piecing with Daphne Greig.
If you are into applique, you can add any pretty applique border. A leaf border would be great for Fall or a holly border for Christmas. I made hearts for this valentine pillowcase.

Of course, embroidery is another option. How about embroidered initials? You could whip up some guest pillowcases quickly, add their initials and give them to them to take home at the end of their stay.


