From time to time I revisit an older pattern and remake it. I did that with "A Freshness of Spring" a while ago.
This quilt was born in 2006. It was created in shades of blue for the background and daisies of white with yellow centers. My remake created more of a scenic view using background shades of green, purple and blue.


Left: Original quilt pattern Right: New colored quilt
The background: If you know the pattern design, you will see that the background is made up of small squares. The original blue background was much easier to blend through from dark to light, not because I love the color blue, but also because there is a multitude of blue fabrics on the market. Using three colors is a little more difficult, however I managed to find the appropriate fabrics in my stash. As you can see, I found several fabrics that have combinations of purple & green, blue & green and blue & purple. This makes the transfer between colors much easier.

Fabric squares which blend through from green to blue and purple

Fussy cutting a fabric so it has both green and purple on it will help blend the colors through
I set about placing all the fabric squares on my design wall leaving gaps where the pieced squares needed to go. These small pieced squares took no time at all to make and filled in the gaps.


This 2 1/2" pieced block is just one of 90 squares that make up the background - yeah I couldn't wait to get started on the applique, it's my favorite part after all!
I then went ahead and started piecing all those squares together. For me, piecing is not my favorite part so I'm always looking for ways to speed the process up. I've learned a few tricks along the way. Learning the basics of rotary cutting, accurate seams and pressing is always essential. Your pieces lock together more neatly, just like a jigsaw puzzle. I have free "how-to lessons" and articles on my website (click the links to find them) so no need to add further information about that here. What I will share is how I speed up the stitching by chain stitching the rows together. Be careful you do not get the layout mixed up!

Chain stitching
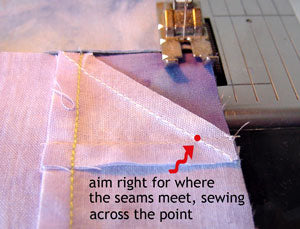
The other point I will share is when stitching any half square triangles, where ever possible, sew with the half square triangle block on top. That way you can be assured to stitch right through the point of the triangle and get perfect points every time.


Perfect points on your half square triangles
The Applique: Although the daisies are white with yellow centers, and the leaves are green just like the original, this time I used a brighter lime green to make the leaves stand out even more against the background. I added a touch of shading and outlines to enhance them even further.

Applique attached really to stitch
The Stitching
One of the things I love about quilting is the actual stitching or quilting used to enhanced the design. Not everyone enjoys this process, but I certainly do. Using the sewing machine and various stitches (I have two favorite), I add coloring through thread work and extra detail with quilting stitches.
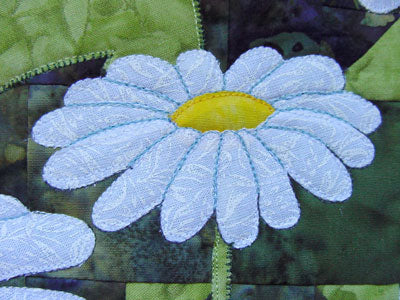
You can see both the styles I use in my new “A Freshness of Spring” quilt. The daisies are outlined in two colors and actually stitched in three. I start with my standard free-form stitching in the color of the applique.

Shows stitching on daisy
Often this is all that is required as the fabrics enhance the design on their own. However for these daisies, because they are white, the white stitching seems somewhat lost unless you can see the actual quilt in person.
So to enhance the quilt and make the stitching visible in photos, I used a dark grey thread around the shaded side of the daisy – lower right edges – and a blue-grey shade on the light edges and also to define the petals. Now you can see how they really stand out.

Darker thread color enhances daisy
To show shading on the leaves I went one step further and changed stitch as well. Along the shaded side I used a very small blanket stitch, which gives the stems a rounded effect.

Shading added to leaves and stem
For the quilting, I changed my thread from invisible nylon used for the mountains in the original quilt to a deep purple. Now you can see them. I used straight quilting for this, but you could easily use free-motion here too.

Stitching outlines the mountains
These mountains remind me of pyramids, which leads me to wonder how “A Freshness of Spring” would look in desert colors. Maybe you would like to try that instead?
I’ve also added some tree like quilting shapes in the center (below mountains) to hold the layers together and straight-line quilt in the border. Both these are additional features not added in the original quilt.

Free-motion quilted trees
Alternative Ideas for this quilt pattern
I find many quilters asking me for alternative ways of making up the background to display the daisies on. For this particular design, there are a number of different ways you can do this. You could simplify the background by using strips instead of squares.

Use stripes to make up the background
For a Strip Background: You will need NINE 2 1/2" strips of fabric for this. Join them in the desired order and then cut them to size as specified in the pattern before adding the borders.
Another idea is to use one full piece of fabric for the background and not have it pieced at all. It is ideal to use something that will contrast the daisies. A scene view might look nice even.

Use a solid piece of fabric for the background
Solid Background: One piece of fabric is all that is required. It should be cut it out and add the borders before adding the applique.
With both these ideas, there will be no small triangles (used for extra leaves and mountains) however you can simply add stitching to replace these or add extra applique leaves around the flower area.
Enlarging the Quilt
As you will see from many of my floral designs, they are wall hanging size. This prompts another question asked by quilters. "How can this quilt be enlarged to fit a bed?" Although I haven’t made a bed sized quilt from this pattern, I can still imagine how I would make it and offer ideas to help you.
Pieced borders seem fitting so I set out a display of 5½” squares around the quilt. I know you must have a lot of those 5½” charm squares so why not use them here? It's a good way to use them up. To make them fit however, we will need to add a 1” border to both the top and bottom edges. The best way to do this is by cutting the original borders at 1” larger than what is stated in the pattern. You will need 24 charm squares to go completely around the outside.

Use 5 1/2" charm squares to add a pieced border
To extend the length of the quilt, add two plain 10” (cut 10 ½”) borders to top and bottom. You can use a decorative fabric for this or a plain fabric adding more applique flowers on it , using the templates provided in the pattern. The picture below shows how I use a 5" plain border and another row of charm squares to make up the 10" border.

Add extra borders, charm blocks and applique
If you finish off the quilt with a 1” border and then add a 4” border before binding off, your quilt will measure 50” x 70”. Further borders can be added to make it larger if desired.
Would you like to give this pattern a try using one of the alternative ideas or simple make it as instructed? You can find details about how to purchase "A Freshness of Spring" here
Happy Quilting!


