Learn to add a creative touch to any quilt with this beautiful butterfly pattern

Easy step by step instructions on how to make a beautiful butterfly supported by preparation and stitching video clips. Add this beautiful machine appliqued butterfly to any quilt.
Add this creative butterfly to any project. Attach it to a quilt, a tote, a book cover, a sweater or a pocket. It is lots of fun and easy to adapt so you can make as many as you like.
What you will Need
- Small amounts of the following items:
- Fusible Webbing
- Stabilizer - approximately 8" square
- Fabric Scraps - 6" square of the main color and small amounts of contrasting colors
- Machine embroidery threads in various colors - one thread to match the main butterfly color and other bright contrasting threads. You may include metallic threads.
- Sewing machine and equipment
- Butterfly Template (see below to get it free)
Templates
Templates are provided in Adobe Acrobat PDF format. If you do not have version 9 of Adobe® Reader™ installed on your computer, click here for instructions on downloading this free utility.
When you print the templates ensure you have ‘Page Scaling’ set to ‘none’. You will find this option on the print screen. If this is not set, your templates will not be the right size.
Sign up as a VIQ member (free) and receive the templates for free: Click here to get the templates
Preparation

Trace the butterfly from the template provided onto fusible webbing. Include all inner lines.
Cut out roughly and then press to the wrong side of your main fabric.

Trace colored sections for wings onto fusible webbing and press to the wrong side of contrast fabrics.
Cut out all sections. Transfer any inner lines through to right side of fabric using a quilter’s pencil/marker.
Remove paper from colored sections and press onto main butterfly.

Do you have difficulty removing the backing paper?
Tip: Use a pin to score the backing paper. This will make a rough edge that lifts up slightly from the webbing, thus making it easier to get a grip on the paper.
Lastly, remove paper from butterfly and press onto the center of the stabilizer.
You may like to view the video I made showing this preparation procedure. It can be seen here:
Butterfly Preparation
Learning Free-Motion
You do need to know how to free-motion stitch to finish off this butterfly. If you would like more information about free-motion, you can find my free lesson here: Learning Free-Motion
Stitching Butterfly
Use free-motion techniques to stitch the butterfly as follows.
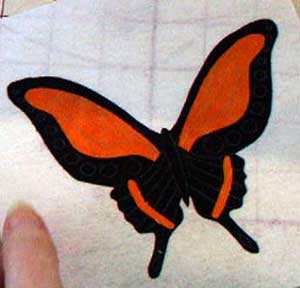
Use black thread to stitch in veins on the colored section of the top wings.
Using the same thread, stitch colored sections on lower wings by stitching small circles over the top of the colored section. Stitch each circle 2-3 times.


Use a contrast thread or thread to match the colored area of the wing, to stitch circles along the outer edge of top wings.


Use a second contrast thread or metallic thread to stitch lines and circles on lower wings.
Tip: When using metallic thread, you may need to use a metallic or top stitching needle and stitch a little slower to prevent the thread from breaking.
Use this thread again to add some outlining stitching on the top wings.

Attaching Butterfly
Trim any excess stabilizer back to the edge of the butterfly.
Press butterfly onto fusible webbing using a Teflon sheet or pressing sheet. Cut away any excess fusible.
Press Butterfly onto the project.
Using matching thread, edge stitch butterfly in place. Stitch again close to raw edges.
Stitch around the body of the butterfly and embroider antennae above the head.

Here is a video showing the stitching:
Attaching & stitching the butterfly
This Butterfly was originally designed for the quilt pattern Array of Color

Happy Quilting!
Ruth Blanchet
Textile artist & teacher
About the Author: Ruth Blanchet is a well-known quilter from New Zealand, is a teacher and designer with over 30 years of experience in the quilt making industry. She is the founder of the “Academy of Quilting”, an online quilting school and has published countless quilt patterns which can be viewed here on our website.


2 comments
Peggy did you click the link above and add your email? The templates will be emailed to you. If you did, be sure to check your spam/junk folder as sometimes they can be filtered in there. Let me know if you still cannot find them, I will email you directly.
Couldn’t get the template. I would love to try this for the first time. It is beautiful.