
- Description
- Requirements
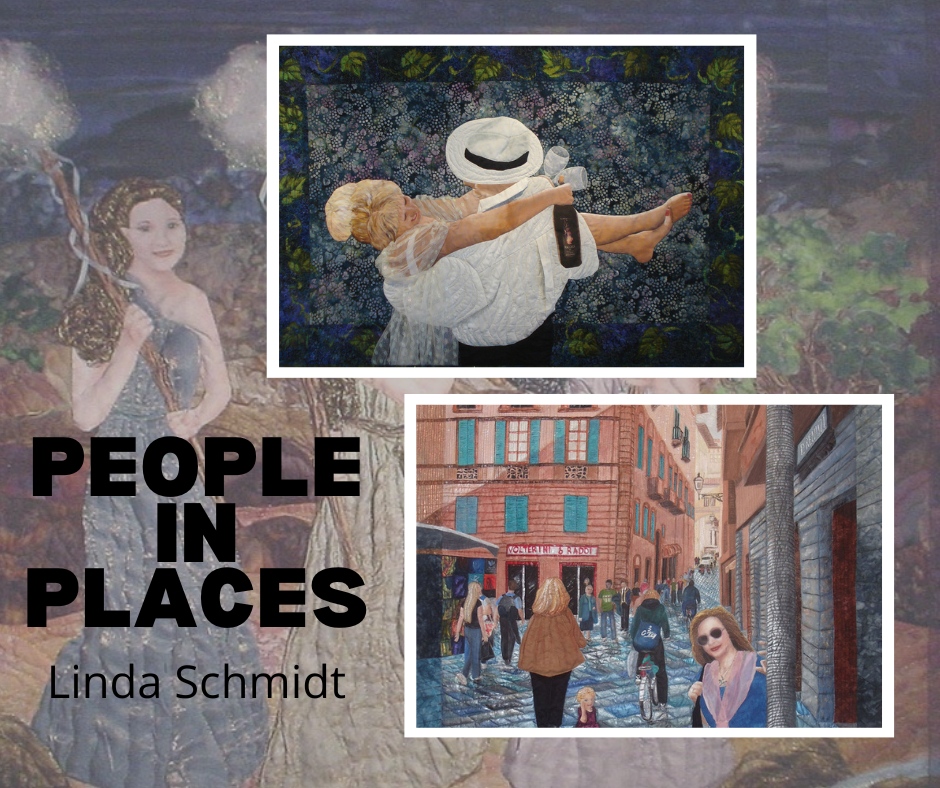
It is the people and the places in our lives that we remember - your daughter's first glimpse of the sea, the time your son tried to fly, the glimpse of a wolf in the woods. Linda will help you translate those photos and memories into thread and fabric, learning a variety of new techniques along the way. You will start out easy, using the teacher's pattern to make a miniature seascape as you learn five different construction techniques and how to give a scene depth and dimension. Then you will make people, starting with a small dancing maiden dressed in silk ribbons with flowing thread hair, and working up to using your own photographs or sketches to create the people and places that live in your memory or in your imagination. This class teaches you how to combine techniques to create unique pieces of art, then shows you how to border, bind, quilt, and finish them. Intermediate to advanced.
Note: Once purchased, you can access the class data any time, 24 hours a day and you get immediate access. (if you don't have an account we suggest you sign up for one prior to purchase)
Time Duration applies only to teacher access for your question and answer duration.
Outline
Lesson One: The Basic Process of Creating a Place
- look at options for enlarging your picture
- using copiers
- using the dot to dot method
- make a small seascape
- make a tracing paper copy
- make a Totally Stable copy
- make a freezer paper copy
- paint the sky
- use foundation piecing for birds
- discuss values and design principles
- choose fabrics for rest of seascape
Lesson Two: Finishing the Seascape
- try burnt-edge appliqué
- use soft-edge appliqué and fusing
- use invisible machine appliqué
- make a thread tree
- quilt the seascape
- or frame it instead
Lesson Three: Making People
- look at people from the side and back
- make a dancing figure
- draw the figure
- shade with chalk
- get some tips for easier appliqué
- look at clothing that is
- painted
- tie-dyed
- printed fabric
- make thread hair
- doll hair
- free motion embroidered hair
- fabric hair
- add wrinkles
Lesson Four: Faces
- trace the person for your picture
- look at larger face options
- look at lots of samples
- practice drawing
Lesson Five: Putting the People into the Scene
- enlarge your photograph
- make your working drawings
- begin constructing the background
- discuss the difference between large and small quilts
Lesson Six: Borders, Embellishment, and All That Stuff
- look at border options
- examine different embellishments
- explore back art
- talk about batting and quilting
- look at squaring up
- learn a binding method
- add a label
Supplies Required for Workshop
In this class, you will be making a very small (8 1/2" x 11") seascape and a dancing maiden, after which you will start on transforming your own photo into fabric. I have put down all of the things that you will need to make the first two projects, but I cannot know exactly what other supplies your particular photo will require, so the following supply list is an educated guess, with a few contingencies thrown in. Do not let it stress you out, because you are in your own sewing room, so you should have everything you need
Fabrics
For the first project, you will need fabric to paint your sky and maybe some of your water, a piece about 14" wide and about 10" tall. I use Mercerized Combed Cotton Broadcloth PFD (Prepared for Dyeing) from Dharma (www.dharmatrading.com), but many quilt shops are starting to carry the PFD fabrics. Any good quality fine muslin (like a good white sheet) about 144 thread count that has been washed and dried without fabric softener will work, as well. If you flick a drop of water at it and the water sinks in, it is fine. If your fabric’s weave is not tight enough, the paint will seep through to the back and you will not have enough color on the front and it will look tacky.
You will also need a small piece (about 6" x 10") of either the same fabric or a flesh toned broadcloth with which to create your dancer. The rest of the fabrics you need depend on the color you paint your sky, but you want a range from light to dark, preferably batiks or hand dyes to get the best effect.
The fabrics you choose for your own individual fabric hanging will depend on the colors of your photo, and you may or may not need more fabric to paint for sky.
To create the shimmer on the sea, get a bit of opalescent organdie (they often call it sheer metallic in the fabric store), sparkle organza or both. You will only need about 10" wide x 4," but it makes all the difference in the world.
A Photo or Two
Choose a picture, preferably of a favorite place, possibly one you took yourself, that you wish to recreate in fabric. If you want to use a picture taken by someone else, you must be sure that it is not protected by copyright. Assume that anything that does NOT give you permission IS protected. There are many copyright-free photos available on the Internet. Just put the words "photos copyright free" in your search box.
Here are some sites:
Sometimes starting with a good photo is the key to a great quilt. After all, just because you are a great quilter, doesn’t mean you are a great photographer, too!
Supplies
- freezer paper
- tracing paper – the kind you trace through, not the garment marking kind; preferably both the regular kind of tracing paper and Mylar tracing paper, one side frosted (available at art supply stores- see note below)
- glue stick
- Scotch Tape
- stiletto (if you have one)
- spray starch or spray sizing (optional)
- package of WHITE Totally Stable
- package of Solvy – regular or heavy weight, NOT Ultra weight
- embroidery hoop about 6-8" in diameter or so (can be an inexpensive one)
- pencil & fine point permanent markers - preferably Ultra Fine Sharpie and Micron Pigma fine line . 01 size. You will need both kinds, and you might want to get the little set of Pigma size . 01 fine line fabric markers
- Lite Steam a Seam II, Misty Fuse, TransWeb or Bond a Web. These are lightweight fusible webbings, and you may or may not need this, depending on your photo. Misty Fuse is a very light, spiderweb thick, fusible which is widely avabilable. Just type "Mistyfuse" in your search engine.
- sewing machine and supplies, including these feet for your machine:
- regular
- open toe
- darning
- regular needles and topstitching needle for sewing machine, preferably size 100 (Schmetz 130N). These may only be available at sewing machine dealers.
- invisible thread for sewing machine (thickness . 004). YLI makes a good one; Sulky has come out with a less stretchy, nylon invisible thread that may work better for your machine.
- neutral regular thread for piecing
- spools of metallic and/or rayon or Sliver thread, in colors suitable to make a tree and fairy hair
- Sewer’s Ease or Sewer’s Aide (clear fluid for lubricating thread)
- scissors for paper and fabric
- rotary cutter, board and ruler
- iron and ironing surface
- pins, seam ripper, the usual gear
- matches, a candle and candle holder, a pie plate and some water
- pastels (the chalk kind) in flesh tones (optional, you can use fabric paints instead)
- paint brushes 1/2" –1" wide for painting skies and a very very fine one for doing people’s faces
- blending stump (optional for blending the pastels into fabric)
- a light box is extremely handy, but a window will do
- a computer scanner is extremely helpful
- Workable Fixative. Optional. If you are worried that your chalks may blur or fade, a spray of this will make them permanent. It will change the hand of the fabric slightly, but if it eases your mind, go for it!
- Woodburning tool with rounded, pointed blade. Optional. For cutting out sheer fabrics easily, but do not buy one just for this class.
You also need fabric paints for painting sky and people. My favorite paints are Setacolors by Pebeo. These are available online at www.dharmatrading.com, www.prochemical.com or www.skydyes.com and lots of other places. If you already have some fabric paints and like them, that is perfectly fine. The colors of Setacolors I use most often are:
- Opaque
- Titanium white (10)
- Pearlescent
- Gold (45)
- Silver (60)
- Pearl (44)
- Transparent
- Cobalt Blue (11)
- Ultramarine (12)
- Raw Sienna (25)
- Cardinal Red (24)
- Lemon Yellow (17)
- Black Lake (19)
- Emerald (15)
- Parma Violet (29)
- Velvet Brown (14)