Blanket Stitching How-to
Getting Started
Before you start stitching using the Blanket Stitch method, you need to prepare your fabric and applique shapes. I find the best method is to use fusible webbing to prepare my design. I have separate instructions for these which you will find on separate pages here: Preparing applique with Fusible Webbing (includes a free daisy pattern) and What is Fusible Webbing
Presser Foot Suggestions
You can use any standard sewing machine presser foot that will accommodate needle oscillation (zigzag stitching). Some machines have different embroidery feet especially designed to ride easily over the bulk of the Blanket Stitches. The embroidery foot is shorter than the standard foot and has a recess under it to allow easy flow of the stitching. Some also have an open-toed embroidery foot with recess. This foot has the front bar missing so you can easily see the stitches as they are formed thus giving you more visibility when stitching.

Standard embroidery foot for Bernina showing recess underneath (left)
Embroidery feet for Janome showing closed and open-toed (right)
Note: as you can see, these feet will vary slightly between brands of machine.
Threads
I prefer machine embroidery threads. The result is worth the little extra money. You can use conventional sewing threads, but they do not outline each shape as well as the embroidery threads.
I use a mixture of cotton and rayon threads, sometimes adding variegated or metallic threads. However, if you are adding shading techniques with the stitching, variegated thread will not work well.

A selection of machine embroidery threads
Machine Settings
Select Blanket Stitch on your sewing machine. It will look something like the picture.

Blanket Stitch setting for a Janome sewing machine
What should I do if I do not have the Blanket stitch on your machine? You can use a similar stitch. Most machines have a blind hem or over-locking stitch that is suitable as shown in the picture. There are many other similar stitches. If you cannot find something suitable, then a small zigzag can be used instead. Practice on your sample to see which you like best.

Two alternative stitch options. You may have others
Set your stitch length and width so the distance between bites and the length of bite should be approximately the same. Generally I use a stitch length approximately 1/8" to 3/16" apart. This will depend a lot on the size and shape of the applique. Small fine appliques require a smaller stitch while large appliques can use up to 1/4" in stitch length. You will find larger stitches are more difficult to handle around small appliques. Practice on your practice sample, altering the length and width of the stitch.

length of bite and distance between bites should be the same distance
If you have the needle-down option on your machine, select this so your needle always stops in the down position. This will keep your fabric aligned straight when repositioning your hands and pivoting.
Machine Tension
Loosen the top tension slightly so that a little of the top thread shows through to the back. Check your tension dial, generally to lower the number is to loosen it. If you are unsure check your manual.
For Bernina machines, threading the eye of your bobbin case will give the same effect.

Shows right side: top thread is green; bobbin thread is white

Shows wrong side: top thread is green; bobbin thread is orange
When you are satisfied you have a suitable blanket stitch, write down your settings so you can refer back to them again later. This is especially important when working on a large project when you will have breaks between stitching. Turning your machine off, will often lose your selected settings.
Here is a chart for you to fill out to help remember your settings for this class:
Your Machine Settings for Blanket Stitch
Stitch No:
Notes
Foot No:
Stitch Length:
Stitch Width:
Tension:
Where/How to Stitch
Stitch along the applique shape so that the needle is stitching just off the raw edge and takes a bite into the shape. The outer line of thread will outline your shape.
Tip: When beginning to stitch, do not start at a point nor on a sharp curve if possible.

Stitching placement
Stitching around Curves
For gentle curves, you can easily guide the quilt around without stopping, however with sharper curves you will need to make pivots. At all times, try to keep the bite (the stitch that swings into the applique) perpendicular to the edge of the applique shape.
Lots of small pivots create a smoother curve than one or two large pivots.
Always pivot with the needle down in the fabric on the outside of the applique shape.
Tip: When pivoting on a machine that goes back and forth over the stitches, always pivot when the next stitch will be going forward to make a new stitch. If you make the stitch when going backwards, the next forward stitch will be out of line.
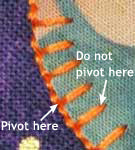
Curves
Dealing with Corners
Remember to always put your needle down into your work when turning or pivoting.
For right angles:
- Stitch right up to corner point, pivot 45°,
- make the stitch into the center and back to the same point,
- then pivot 45° again before continuing along next edge.

Right angled corners
For sharp angles
Use the same procedure as for Right Angles except for pivoting 45°. Instead, pivot half the distance of the whole angle where the bite is positioned along the line of symmetry, thus an even amount of fabric will show on both sides of the stitch. You will notice that sometimes stitches will overlap slightly.

Sharp angled corners - bite is aligned with line of symmetry
Locking off Threads
Some machines automatically lock off the stitches for blanket stitch, however if yours does not, there are several ways you can lock the ends of your threads in place. This applies to both the beginning and ending of your stitch line. If you can overlap the ending onto the beginning, you do not have to do anything special to your starting stitches.
- drop feed dogs and take several stitches in place
- shorten stitch length to zero and take several stitches in place
- pull threads to back of work and knot off
Fray Check or similar products may be used with these methods as well
Be sure to check that your stitching is correct before starting your project. If you are having difficulty, send a scan or photo of your stitching into the gallery and I will give you suggestions on how to correct the problem.
Author: Ruth Blanchet
© Copyright 2012- Arbee Designs. All Rights Reserved. This content is copyrighted by the respective teachers or authors of the article/lesson presented on this page. Unless otherwise indicated, all other content is the property of Arbee Designs. You may not make copies of the material for others without the written permission of Arbee Designs.