
Today I want to show you how to make a quilting design from a single motif or applique design as you see in my art quilt Summer Reflections.

Summer Reflections
The leaves you can see in this quilt can make some really nice designs that can enhance your quilt. If you have a pattern with single applique shapes this works great. As an example I will use the leaf shape in Summer Reflections.
The first thing I do is draw the applique shape onto freezer paper. I can then cut it out and press it (shiny side down) anywhere on my quilt. I pressed mine onto the center of a block.

Freezer paper leaf
Instead of freezer paper you can use Avery labels. With the Avery labels you just peel off the backing to expose the sticky adhesive then press that onto your quilt with your hand (not the iron). Like freezer paper these can be used over and over many times.
Using your free-motion skills stitch around the freezer paper template. Once complete the freezer paper can be peeled off and stuck down in another location. I usually make several templates to work with.
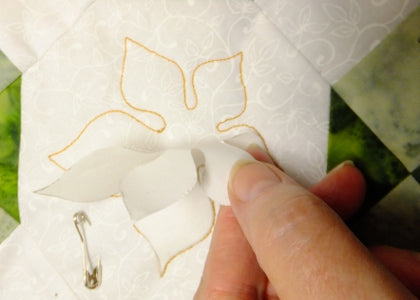
Peel off the Freezer Paper
Now you have a beautifully quilted leaf with no markings on your quilt top.

Quilted Leaf
If you want a continuous edging you could link the leaves together with simple curves. I added a loop to mine just to fill in the area and make the arch between each leaf a little smaller.
 Leaves connected by loops
Or another idea is to vary the size of the leaves and then connect the tips together to make it continuous. For this design I quilted along one side of all the leaves first (I used several templates) and then went back along the other side. By doing this I didn't have to stop and start. For example, I stitch the inner side of the leaves first (blue line) around the whole border, then once I get back to the start, I stitch the outer side of all the leaves (black line).


Continuous leaves
After connecting all the leaves you might like to echo the lines to make the leaves really stand up. I'm sure you can come up with other ideas too. Perhaps you'll make some suggestions below.
Notes: This blog post is based on my Celtic Jewel quilt and how I quilted it. If you look at the closeup, you can see the individual leaf designs inside of blocks, the 'looped arches' inside the small gold border and the continuous leaf design between the applique leaves in pale green border.


