
Needle Turn Applique Continued It's time to stitch the first section of applique in place. Do you have your needle and thread ready? Tip: do not start with a very long thread, this will only tangle and knot. Keep your thread short to work with, only enough to stitch one or two petals at a time.
Starting at one point on the petal, I use the point of the needle to tuck under the seam allowance inline with the drawn line.
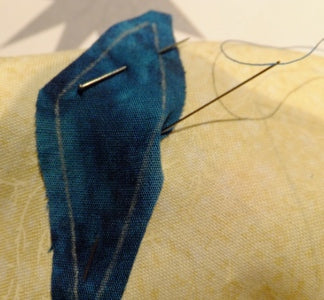
Start by tucking under the seam allowance with the point of the needle
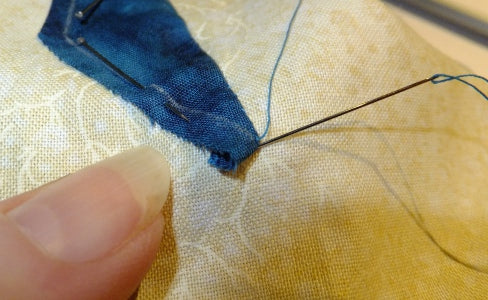
The needle should come up from underneath the applique section so the knot is hidden underneath it. The first stitch is taken down into the background directly below where the thread first comes out and comes out just a little ways along the line on the applique shape. About 1/8".

First stitch
Repeat that along the line, tucking under the seam allowance as you go with the point of the needle.

Tiny stitches along the seam line
You should barely see the stitches. You can only just see them in this side photo.

Side view
When you get to the corner, you need to do an extra stitch. This locks the point in place.

Corner locking stitch
There was a little much excess on this shape point, so I trimmed back a more of the seam allowance to reduce the bulk.

Trim back the excess seam allowance
It takes several swipes of the needle to go around the corner. First turn under the point, back to the locking stitch.
Swipe the needle to tuck under the end
Then another on an angle. Give the thread a slight pull to keep the petal pointed.

A second swipe of the needle
And then tuck again and take a stitch down the side.

Third swipe and stitch
I went only to the next corner because the second petal will cover the raw edge below this point.
Here's how the back looks.

Stitches on the back look like this
Now a second petal is pinned in place. Be sure it aligns with the drawn lines on both the background and first petal.

Second petal pinned in place
This time start stitching from the center point of the flower and continue around 3 sides only. The last side will be covered by the next petal.

Second petal stitched
Making progress, halfway there now.

Five petals stitched in place
How are you doing? Do you use a quilter's knot to start? Do you know how to end off your thread correctly? We will take a look at that in another post coming soon!


