
A while ago I decided I wanted to add some applique to a sweater. I've done this on a number of occasions and whenever I wear such a sweater, I always get compliments - probably because no one has ever seen one like it before.
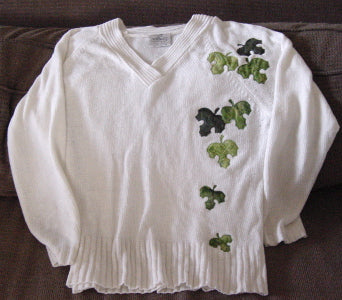
appliqued sweater
Materials
Here's what you will need:
- A pre-made sweater or sweatshirt **see notes about these below
- Applique templates
- Cotton fabric for appliques
- Fusible web (light-weight so it is easily stitched through)
- Iron-on stabilizer
- Decorative machine embroidery threads
**Notes for Sweaters and Sweatshirts: If you make your own, then add the applique before sewing the underarm seams, it is much easier that way. Purchase a good quality brand as you want to keep it looking good. Some of the less expensive brands rub up with fluff which tends to look shabby after a few wears..... after all the effort you put in to adding applique, you want to get lots of wearing out of it. Any style can work however a drop shoulder is easiest to avoid seams especially if your design goes over the shoulder. Open necks also make it easier to maneuver around.
Tools
- Sewing Machine (the same thing can be achieved with hand applique - don't use fusible webbing though. For more information on hand applique see my free lesson: How to Applique)
- New needle for machine
- Pressing sheet
- Sharp scissors and other sewing supplies
Getting Started
Prepare your applique shapes as you would for a quilt by drawing the shapes onto fusible and pressing them to the wrong side of your cotton fabric. Cut these out and remove the backing paper. For further details on how to make fusible applique shapes see my free tutorial: How to Applique
Check the sweater to see where you can comfortably get it under the foot of the sewing machine before adding your applique shapes to it. Remember, you need to thread the sweater around the bed of the machine so you are stitching through one layer only. Removing the bed so you are working on the arm only will make it much easier to maneuver around.

Removing the machine bed makes it easier to maneuver
You want to avoid pressing the applique shapes down the sleeve as it is difficult to maneuver the skinny sleeve under the foot. You may wish to mark out the area with pins or chalk - don't mark it with any marker that won't brush off (I don't even like the washable markers for this). If unsure, test the marker on an inconspicuous area on the inside of your sweater.
Position the shapes mainly down the front or back but avoid placing them over seams. The top of the arm usually works fine too, especially if you are taking the design over the shoulder. Press them in place using a pressing sheet. Be careful your iron isn't set too high, you do not want to scorch the sweater. I often use just the tip of the iron to press the pieces on.
Apply the iron-on stabilizer to the inside of the sweater, underneath the applique shapes. This is especially important if it is a knit sweater as it will stretch very easily. The stabilizer will prevent the sweater from stretching.
Now all you need to do is stitch the appliques in place. I use blanket stitch, zigzag, or free-motion. If using free-motion, you should stitch around each shape at least twice.

appliqued leaves stitched with free-motion
Once the stitching is complete, remove the stabilizer, give it a good press using the pressing sheet and you're ready to wear your one-in-a-kind sweater.
Here's is one I made years ago - it's been washed and worn heaps. The grape vine goes up and over the shower of a set-in sleeve sweatshirt. It's now over 25 years old! I still wear it down on the farm - probably the best dressed farm attire around!

grapes and leaves applique on sweater
And here is applique that I'm adding to a jacket which I'm made making from scratch. The same thing appliques where you need to use a stabilizer underneath to support the fabrics.

applique and stitching on the front of a jacket
Will you give it a try? I'd love to see what you will create!
Happy Stitching...


