
Today I want to share Anita's double binding for quilts. With its double thickness of fabric it is strong and stready thus exceptionally good for bed quilts.
As always, square up your quilt before starting. If you need help with this visit this page: Squaring Up Your Quilt
Measure through the center of your quilt, top to bottom. Check to be sure that the sides of your quilt are the same length as the center measurement. If the sides are slightly larger, a line of stitching can be sewn along the edge to pull it in. This will ease the difference into the binding. Repeat for the horizontal measurements.
To figure out how much fabric you will need add your two measurements together and times by 2 to get the circumference of your quilt. You will need to then divide the result by 40 (approximate width of fabric) and then round upward. That will be the amount of strips required for the binding. I always add a little extra for wiggle room and bias joins.
Cut 2 1/4" strips x WOF (width of fabric) from your binding fabric.
Join binding strips using a bias join to make one long strip.

Cut one end of your binding strip at a 45-degree angle and press under 1/4" seam allowance along this edge.

cut end at 45 degrees
Fold the entire strip in half, lengthwise.

press in half lengthwise
Place raw edge of binding strip along raw edge of quilt with pressed end midway along one side.
Using your walking foot, stitch a 1/4" seam stopping 1/4" before the corner.
Pivot your quilt ready to stitch second side, but reverse off the end instead. Quilt may be removed from machine at this point.
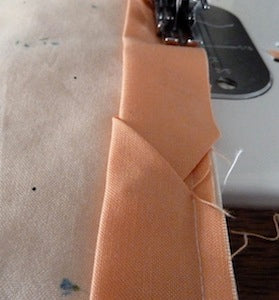
Fold the binding at 45 degrees so it is in line with side of the quilt that will be sewn next.
Make a second fold in binding at the edge of the quilt leaving a small 1/4" pleat, laying the binding down with raw edges even with the next side to be sewn. Place quilt back under machine foot and proceed to stitch down second side of quilt.

turn by folding in a small pleat
Repeat this for all corners and continue to stitch the last side of the quilt up until about 8" before the starting stitches.
Ensure the binding is even with raw edge of quilt and overlaps folded edge at beginning. Trim top binding at same angle as folded edge leaving approximately 1/2" overlap.

trim leaving a 1/2" overlap
Tuck ends into the beginning fold.
Tuck end in
Finish stitching binding in place.

Finish stitching in place
Fold the binding over and take just a few stitches to baste the binding point in place. This keeps it together while pressing and sewing the binding on the back. After the hand stitching is complete remove these few stitches.

tack together
Press binding over seam allowance.

press binding over seam
Press binding on back to cover seam line.

press binding to cover seam line
Hand stitch in place.


