
I've been thinking about small gift ideas for Christmas. I have so many 'big' ideas but never start soon enough to get them made for Christmas! So today I'm going to share this idea to make easy and reasonably quick gifts.
I collect all sorts of craft things that I may find useful. While sorting through one of my craft containers I remembered picking up some metal hoops a couple of year back. Metal hoops come in lots of different sizes but I choose 200mm (about 8") hoops to work with as they would be the perfect size for my two smallest butterflies in "Spring Life" BOM quilt.
I made the two butterflies - the purple butterfly

purple butterfly
and the blue butterfly.

blue butterfly
By the way, these are both fairly quick projects to make and are available separately: Blue Butterfly and Purple Butterfly
I'll start with the purple, I wondered how the best way would be to use the hoop and attach it.

metal hoop positioned on block
First I decided to make a bias binding using my clover bias making tool to make 1" bias tape. I'd use this to go around the outer edge so I could fold it over the hoop on the back.
I cut a 2" wide strip to make the bias binding and started this simple process. Tip: Remember to keep the iron close to the tool as you move along - you get a better result.

Keep the tip of the iron close to the bias maker
I drew around the outside of the hoop and trimmed back the excess from the block leaving about 1/4" seam allowance, then sewed the bias around it being careful not to overstretch it. A note worth mentioning here: If you are trying this step-by-step, read down the page first making sure you are aware of the issues I had first. It will help prevent you from making mistakes too.
stitching bias around the edge
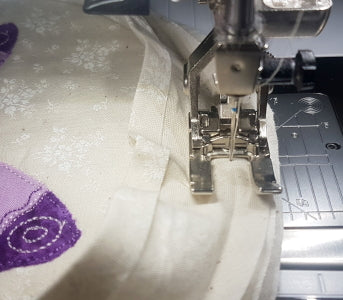
I was able to fold the bias over the hoop and pin it in place easily. With this done, I could now use my free-motion technique to sew close to the inside of the hoop. Since the hoop was quite thick, I could use it as a guide as one would do with a quilting ruler.
That worked well although in places I wasn't so straight! More practice needed for sure. Needless to say, that stitching got ripped out and I tried again. Perhaps I should have tacked it in place first!
Another problem I was having was the seam wasn't quite on the edge where I thought it should be and being somewhat crooked in places, bothered me a lot. No matter how much stretching I did, I couldn't get it to look good!

I definitely needed something to cover that so I made a 1" wide binding in purple connecting the ends to make a loop.
The purple binding was divided into quarters and I also marked quarter points around the hoop. I matched the marks then pleated up the fullness pinning the pleats in place as I went.

I used a contrasting thread to stitch the pleats.

Tip: You can see how I've stitched right up very close to the pin, using my needle down function to stop just before it. I can now lift the foot (with my knee lift) and remove the pin before stitching onto the next one. Never stitch over pins!! If you accidentally hit one you could damage the inside of your machine. It isn't worth it!
The frill was hot glued in place around the edge to cover that seam I didn't like.
To finish off, I stitched a picture hanger at the top and hot glued a piece of card on the back.

picture hook added to the back
Here's how it looks..... I think I'll try something a little different for the blue butterfly!

Finished purple butterfly
I'll be back tomorrow when I show you what I did with the blue butterfly block.


