Cutting Border Strips for Mitering: Cut border strips the length or width of the quilt plus 2 x the width of border. Add a little extra for safety. Half an inch or so is good.
Step 1: Mark center points on each side of quilt with a pin. Mark center of each border strip with a pin.
Step 2: Position first border strip to one side of quilt, right sides together and raw edges even, matching center points. (border will extend passed edge of quilt) Pin border to quilt placing pin on both ends 1/4" in from end of quilt. When sewing the seam, we need to stop 1/4" from each end so the pin will let us know where to stop and start the seam. Sew this first border in place. Finger press seam allowance toward border.

Start stitching 1/4" in from edge of quilt

Step 3: Repeat for all border strips being careful not to stitch into the 1/4" seam allowance on all ends.
Step 4: Fold quilt through diagonal so border strips lay exactly on top of each other. Push seam toward quilt.

Align your ruler with 45 degree angle along straight edge of border strip so edge creates a 45 degree angle from end of seam. Draw along edge of ruler. This will be your stitching line. Place a pin through point if needed, to hold layers securely.

Step 5: Sew along stitching line being careful not to stitch into seam allowance at miter corner.
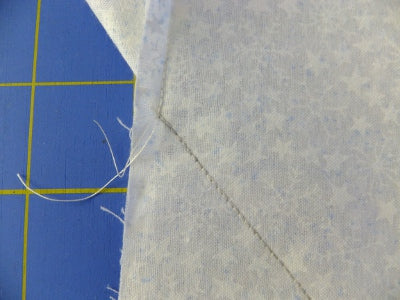
Step 6: Open seam and turn over to front to check miter. Ensure it is sitting correctly. If it is not, then you either sewed into the seam allowance or the border seams were not aligned together correctly.

Here is a perfect miter
Step 7: Turn to back again. Trim seam to 1/4".

Press seam open. Press border seams toward border.

Repeat for all corners.

