
Today I have been playing around with foundation piecing, otherwise known as paper piecing. One of the reasons quilters love foundation piecing is because when done correctly, the blocks come out perfectly every time with all points matching evenly. Every quilter wants that!
Before starting on this lesson, you might want to check out some Tips on Foundation and Paper Piecing
The thing quilters least like about paper piecing is removing the paper foundations. If you don't like the process of removing the paper, then it is easy to overcome by using a non-woven interfacing for the foundations which can be left in the quilt, or even a wash away stabilizer that washes out later.
I decided on some golds and turquoise colors for my sample. I'll use 5 fabrics - some darks and lights for this square in a square block will work ready well.

With fabrics selected all I need is:
- to print the foundations. I'm using a 6 square in a square. You can download the template here: 6" Square in a Square Foundation Template
- set up my sewing machine with new needle and slightly smaller stitch length
- have the iron turned on
- my basic patchwork supplies (rotary cutter, mat etc)
- a piece of card (I used a postcard but an index card or side of a cereal box will do)
- a water soluble glue stick.

Square in a Square block
I pressed my fabrics and cut squares from the 5 different fabrics.
- ONE 2" square for the center (you might like to make this slightly larger)
- TWO 2" squares for round 1
- TWO 2 1/2" squares for round 2
- TWO 3" squares for round 3
- TWO 4 1/4" squares for the last round.
I cut all but the center square through the diagonal into triangles.

Cut the squares for rounds 1-4 into triangles - don't cut the center square
By the way, if you didn't know, you put the fabric to the plain side of the foundation and you stitch on the printed side.
I'm ready to start, are you?
Use a dab of glue to stick the wrong side of your small square to the unprinted side of the foundation. Hold the foundation up to the light and you will see the fabric through it. Make sure it covers the inner square (A1) and goes beyond the lines by at least 1/4" - that's your seam allowance. Look for the triangle marked A2. Try to make the seam allowance straight and only 1/4" wide - that way you don't have to trim it and it's less likely that the square will move out of place too.

Hold it up to the light so you can see the fabric through it
Align one of your smallest triangles (for round 1) even with the A2 seam allowance, right sides of fabric together.

Right sides together
Now move to your sewing machine. I use an open toed foot so I can see all the line I'm sewing. I'm going to sew the line between A1 and A2, starting right on the point.

Ready to stitch the first seam
A few tiny stitches very close together will secure the ends, then it is simply stitching on the line and a few small stitches again at the end, stopping directly on the point. Now that was easy wasn't it?

First seam stitched
Over to the ironing board, with paper side down, press the triangle over the seam. You can hold the foundation up to the light, foundation toward you, to see that the fabric edges are beyond the A2 lines. If they are not, then I'm afraid you will need to use your seam ripper. If they are, very good, we can move on to the next step.

You can see the fabric covers the area it should
Back to the cutting mat, we have a little trimming to do. With paper foundation up, place your postcard along the A1/A3 seam line.

Postcard on A1/A3 seam line
Fold the foundation only, not the fabric, over the card to expose the seam allowance on the other side.

Fold foundation over postcard
Using your ruler, align the folded edge of the foundation up with the 1/4" line of your ruler, then trim the excess off. This will leave an accurate 1/4" allowance.

Align the 1/4" rule mark with the fold
Here is mine trimmed.

Seam allowance trimmed
Time to add the next triangle. Do exactly the same as you just did.

Second triangle ready to be stitched in place
Press it and check it.

Triangle Pressed over seam ready to trim
Add the remaining two triangles for the first round - A4 and A5.

First round triangles all added and pressed
Let's check!

Hold foundation up to the light to check
Let's speed things up a little. Now that you have the first round of triangles on, you can trim all the seam allowances for the next round using the card to bend the foundation and aligning the 1/4" mark on the ruler with the folded edge. Remember you must leave that 1/4" seam from the folded foundation.
Time to start the next round.
First triangle - follow the numbering on the template and remember right sides together.

First triangle for second round
Instead of going to the ironing board just yet, add the triangle on the opposite side. That way you can press both at the same time.

Add opposite corner - press and check
Then add the remaining two triangles.
Trim all four sides again.
Second round complete
Now add the next round.

Third round complete
And the final round. When the last round is done and after a good press, place your block, fabric down and trim around the outer edge of the foundation. Remember that's 1/4" beyond the points.

Trim block 1/4" beyond the points

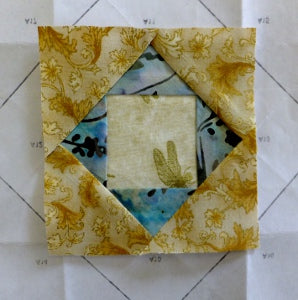
My complete square in a square block
Your block is finished. Are you ready to make another?
This is a five fabric Square in a Square block measuring 6" when finished. You can easily make it a four or three fabric block too, just leave off the extra rounds, but be sure when you trim to leave 1/4" seam allowance around the block beyond the points.
Use this technique to make some advanced projects like Kaleid-ing Stars

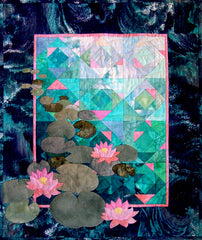
or if you like to add some applique - Lily Pond - this uses Square in a Square foundations with three rounds and a center square.
Let me know how you got on in the comments below.

