
You've spent all that time creating your beautiful quilt so it is important to get the borders correct. Attaching border strips without measuring them first is a disaster waiting to happen. Your quilt will NOT be square and you may even have ripples along the edges. Don't skimp on the finishings - be sure to take a little extra time to finish your quilt correctly.
Squaring Up Your Quilt
The first step is to square the quilt edges. It may look square but it is important to measure and make it correct before starting.
Lay the quilt out on a flat surface with your cutting mat under one corner. Use the largest square ruler you own and put it in the corner. Use the aid of a long ruler to ensure your line of trimming will be straight all the way down the side of the quilt. You need to trim so that all the sides are straight, the corners make right angles and the quilt, when folded, will meet exactly in the four corners.
How To Measure for Straight Borders
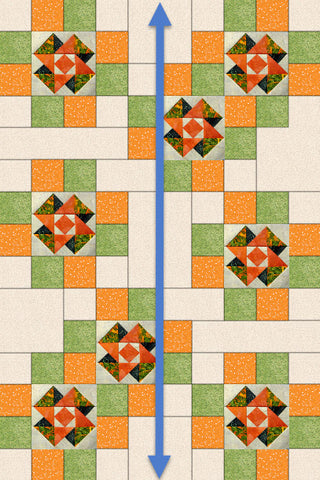
Lay the quilt on a flat surface and measure through the middle from top to bottom. This gives you the side measurements. Measuring through the center gives the average measurement of the two sides - just in case it isn't quite square.
Cut two identical strips this measurement.
Note: You do not have to actually measure the quilt with a tape measure or ruler. You can just lay your border strip on the quilt top and cut to the size of the quilt. Cut two identical strips. This only works for straight borders, not mitered borders.
Pin the middle of the strip to the middle of the quilt, pin the ends, then pin between the pins dividing the area up and easing in any fullness. Use more pins for longer quilts. Sew the border in place stitching with the piece with the most fullness underneath (the feed dogs help pull through the fullness evenly). After stitching, press strips away from quilt.

Lay the quilt on a flat surface. Measure through middle including the two borders you have just added. This gives you the measurement for the top and bottom. Cut two identical strips and attach as instructed before. Press the border away from quilt.
Note: you can do the measuring the other way around to add top and bottom strips first and the sides on last.
Measuring Straight Borders with Cornerstones

In this case, you would measure the center of the quilt in BOTH directions, without sewing on the first set of borders and cut FOUR strips this length. Cut FOUR cornerstone squares to match the width of the strips. For example, if your border is 4 1/2" wide, each cornerstone would be 4 1/2" square.
In the picture, I have used blocks for my cornerstones.
The cornerstones are added to the ends of one set of strips, either the top and bottom strips or the side strips. The strips without the cornerstones need to be added to the quilt first.
Measuring for Multiple Borders

Multiple borders are done in the same way as described above adding and measuring one border at a time.
Each time a new border is added, measure the entire distance through the middle of the quilt to include the borders as you did when adding the sides on the straight border above.
Measuring for Mitered Borders
A mitered border is measured in the same way as if you were adding cornerstones where you measure both directions of the quilt, however do not cut the strips this length as we need to add extra fabric to make the miters. You must add the width of the border and another 1/2" on EACH side of the strip (the ends of the border strips need to overlap so you have enough fabric to create the miter).
For example, the math would look like this:
1/2" + border width + quilt measurement + border width + 1/2"
The extra half inch includes the seam allowance and a little wiggle room for creating the miter.
I find it actually helps if I draw a little diagram to make sure I have the calculation correct.

Attaching borders to form mitered corners is a little bit different. You begin by sewing all four borders on the quilt. For details on how to do this, see this lesson: Mitered Corners
Figuring Out the Fabric Requirements for Borders
Using the lengthwise grain means that the fabric has no stretch or give and you may end up with unpieced strips. You have to plan for this from the beginning to work out how much fabric is required. In this case, to figure out the amount of fabric needed would simply be the length of the longest border plus seam allowances for straight borders assuming they are less than 10" wide. You would need to calculate extra for mitered borders as noted above.
For large quilts, it is more economical to cut border strips from the width of fabric. When doing this, you are still on the straight grain but you do get a small amount of stretch. These shorter pieces have to be pieced for long borders and this should be done using a diagonal or bias seam. Using a bias seam makes the join almost invisible. This kind of seam uses more fabric than one where the ends of the strips are butted together.

On each join you lose the width of the strip plus any amount you overlapped. The overlap can include the selvage since it will be trimmed off.
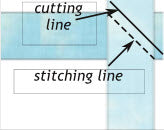
Place fabrics right sides together and sew a diagonal seam to make a bias join.
Trim excess fabric away.
Formula for Calculating Fabric Amounts
For my example I will base the calculations on 40" wide fabric with the following quilt and border measurements:
Quilt is 70" x 45" before borders are added
Borders are cut 3" wide (2.5" finished)
For Straight Borders
Find total length of border
That is the length of all four border strips:
(70" x 2) + (45" + 3") x 2 = 236"
(2 x length of quilt plus 2 x width of quilt with added border)
To calculate the amount of fabric for each bias join
Divide total length of border by width of fabric (40") to get the number of strips needed:
236 ÷ 40 = 5.9 (rounded up to 6 which means you will have 5 seams)
For each bias seam you will need the width of border strip plus 1":
3" + 1" = 4" x 6 seams = 24"
Add this number to your original total length of border:
236 + 24 = 260
Divide this amount again by the width of the fabric to determine the number of strips needed to be cut:
260 ÷ 40 = 6.5 (round up to 7)
So 7 is the actual number of strips you need to cut to make your border. If buying fabric I always add an extra strip to the calculation just to be sure. Our cut border width is 3" so 3 x 8 = 24" of fabric when purchasing.
For Mitered Borders
Find total length of border:
First, calculate the amount of fabric for each mitered corner by adding width of border plus 1/2" to each end of each border strip.
3" + 1/2" for each end of strip = 7" needed to complete EACH miter:
4 corners x 7" = 28"
Total length of border will be:
(70" x 2) + (45" x 2) + 28" = 258
To calculate the amount of fabric for each bias join
Divide total length by width of fabric by the total length of border to get the number of strips needed:
258 ÷ 40 = 6.45 (rounded up to 7 which means you will have 6 seams)
For each bias seam you will need the width of border strip plus 1":
3" + 1" = 4" x 7 seams = 28"
Add this number to your original total length of border to get a new total length:
258 + 28 = 286
Divide this amount again by the width of the fabric to determine the number of strips needed to be cut:
286 ÷ 40 = 7.15 (round up to 8)
8 is the actual number of strips you need to cut to make your border. If buying fabric I always add an extra strip to the calculation just to be sure. Our cut border width is 3" so 3 x 9 = 27" of fabric when purchasing.

